Strategy[]
The strategy tab is the tab where you will set your strategies.
Included on the strategy page is what we'll split into seven categories:
- Strategy Selection
- Laning Assignment & Behaviour
- Player Builds
- Player Behaviour
- Team Behaviour
- Champion Pick Order
- Champion Ban Order
There is not one overall best strategy, however players work together and against each other to determin what is the best strategy for the game, this is considered "The Meta". Some parts of an opponents strategy can be determined from playing games against them, you can also create a counter strategy to give yourself an advantage when playing them.
Subscribers are able to import and export strategies in the form of text, these can be saved locally and allows players to quickly switch between strategy.
Strategy Selection[]
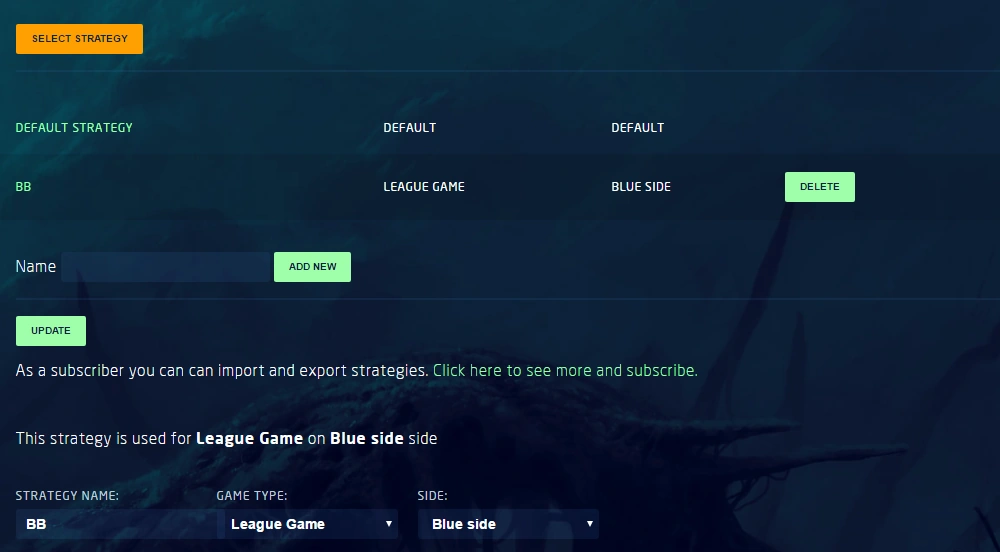
At the top of the page is where you'll be able to create new strategies, manage existing strategies and import and export the code of strategies if you're a subscriber. By default, you have one strategy, your "Default Strategy", which will be the basis for all new strategies you create, and be used if you do not have a specific strategy set up for a game type & side.
To create a new strategy, simply click on "Select Strategy", type in a string of letters in the "Name" box and hit "Add New". Voila! You should now be managing your new strategy, and to go back and select a different one, click on select strategy and select the strategy you wish to manage/view! Keep in mind, each new strategy you make will take on the build, behaviour and pick & ban of your Default Strategy, which will be covered below!
With each strategy, you can select a game type and a side to play. The game types you can select are Sandbox Games, Team Ranked Games, League Games and Tournament Games. This allows you to create specific strategies for your opponents in advance while keeping them hidden from prying eyes playing you in Sandbox or giving them away in your Team Ranked games! Making use of this feature is important to winning your league and keeping your team safer from scouting.
Laning Assignment & Behaviour[]

Assignment: In MobaManager you can assign your players to lanes in the strategy tab. You can choose which player you want playing in which lane. This will change the positions your players appear on the players page. There are five different roles; AD Carry, Top, Mid, Support and Jungle which assign your players to different sections of the map, mimicking League of Legend's Meta role assignments, and each of these roles champions that are best suited to those roles. AD Carry and Support go towards the bottom of the map, Mid goes towards the middle of the map, Top goes towards the top side of the map and Jungle roams the in between sections of the map where the jungle creeps spawn and can visit any part of the map before grouping. After grouping happens, all roles tend to converge, explained in the "Team Behaviour" Section
Lane Behaviour: In Lolmanager you can select laning behaviour for each role. Laning behaviour is selected out of 4 options, Hug Turret, Farm, Harass and Kill. Hug Turret will make your player focus on hugging the turret and trying not to die, Farm will cause your player to focus on attempting to farm as many minions as possible, Harass will cause your player to attempt to whittle the enemy down and Kill will make your player focus on killing the opponent and gaining as many kills as possible.
Jungle behaviour can be selected out of 5 different roles, Farm Only, Farm Oriented, Farm and Gank Oriented, Gank Oriented or Heavily Gank Oriented. These options decide how often your player will decide to gank their lanes - will they power farm the jungle for as many jungle creeps as possible, or will they ignore that and try to assist & influence their lanes?
Of course, this is only a brief summary of what each option will do, experiment & watch your replays to figure out what's effective and what's not!
Player Builds[]
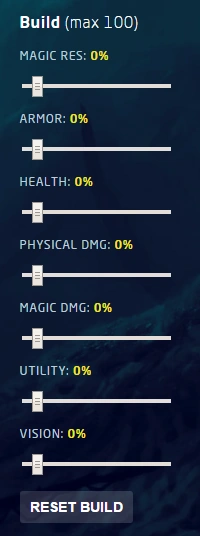
Welcome to the Player Builds. Here, you can assign a value between 0 and 100 to 7 different categories, which can add up to a maximum of 100 points, though you are capable of assigning less. You manipulate the sliders from left to right, right being adding points and left to subtract. The seven different categories are as follows; Magic Res, Armor, Health, Physical Dmg, Magic Dmg, Utility and Vision. We'll cover what each of these do in a little on an individual basis, but together these make your player builds, and this will decide how much damage they do and how long they can survive compared to their counterparts. How effective some of these are on your player will depend on what champion they pick - High Utility will be better on a champion with high utility stat, for example. This is covered in more depth in the Champion Stat Explanation section of the Wiki. On to what each represent.
* In this section I will be using the term "points", this is the value you will see if you check your "live team stats" in the Game Replay. I also use the term "game replay tick" - this is each 5 ingame seconds in the Game Replay. Game Replays are covered in more detail in the Games section of the Wiki.
Magic Res: Magic Res is short for Magic Resist. This stat determines how much magic resist points your player gets, and is used to take less damage from enemies that deal Magic Dmg.
Armor: Armor determines how much armor points your player gets, and is used to take less damage from enemies that deal Physical Dmg.
Health: Health determines how much health points your player gets, and determines how much damage your player can take overall before dying. Once your health points hits 0, your player dies and is forced off the map to respawn.
Physical Dmg: Physical Dmg is short for Physical Damage. This stat determines how much physical damage your player will deal - the higher the value, the more health points your player will take away each game replay tick in combat. The amount that your player deals is reduced by Armor.
Magic Dmg: Magic Dmg is short for Magic Damage. This stat determines how much magic damage your player will deal - the higher the value, the more health points your player will take away each game replay tick in combat. The amount that your player deals is reduced by Magic Res.
Utility: Utility is determines how much your player heals their teammates health points each game replay tick. It also determines how many they shield each player for each replay tick.
Vision: Vision determines how aware your player will be of ganks and their ability to respond to them.
Reset build simply resets all your values to 0 - use this to start fresh!
Player Behaviour[]

This section is rather simple. There are two things to set, the first of which being Teamfight Positioning. You have seven values to choose between;
- Stay Very Behind
- Stay Cautious
- Look For Opportunities
- Go With The Flow
- Take Risks
- Go Deep
- Go Very Deep
These 7 settings determine how your player will play when grouped. Will they play risky and dive in deep, playing the frontline role, or will they stay very behind, playing safe and trying to take as little damage as possible, or will they play something inbetween? Experiment with these to find the best combination for your strategy, depending on your opponent's strategy these may have varying effectiveness's.
And the other option, Recall When Reaching Gold. You have seven values again; 400, 600, 800, 1000, 1500, 2000, 3000. This simply determines how much gold your player has to have to recall and spend on improving their build and gaining more stats for combat.
Team Behaviour[]


Start Grouping At
Attempt Dragon
Attempt Baron
Team Strategy
Teamfights Type
Champion Pick Order[]


This determines in what order your team will prioritise picking their champions. Only one champion can be picked into each role, so if multiple champions in the same role are queued up, once the highest priority is picked, it will move onto picking the next role.
Pick order is different depending on which side your team is playing on. On Blue Side, the pick order is; You Pick 1, Opponent Picks 2, You Pick 2, Opponent Picks 2, You Pick 2, Opponent Picks 1.
On Purple side, the pick order is; Opponent Picks 1, You Pick 2, Opponent Picks 2, You Pick 2, Opponent Picks 2, You Pick 1.
This generally means, if there is a champion integral to the strategy, the Blue side will get a chance to pick that first if it is not banned in the ban phase. On the other hand, Purple side gets the chance to secure two integral picks at once to their own strategy away from the enemy.
Champion Ban Order[]

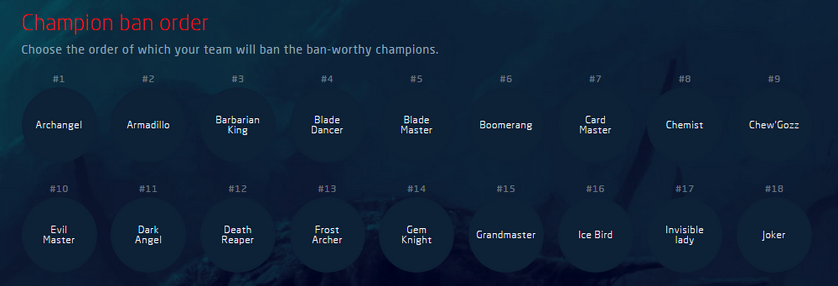
The ban order determines in what order you prioritise bans, of which there are two to each side, four total. Blue side bans first and third, Purple bans second and last. If an opponent bans one of your first or second bans on blue side, your team will resort to the tier 3 ban. If the opponent bans are identical to your 1, 2 and 3 when you are on purple side, it will ban your tier 4 ban. Blue can never be forced to ban it's #4.